Each one of us using a printer encounter a situation when we need to get large document files printed rapidly without having to wait for the other task to finish.
Irrespective of the type of printer being used, you may encounter this situation but the printer might throw a printer spooling error.
This is when the printer slows down as too many tasks line up. As printer spooling service is enabled in printers by default specially in these best printers for chromebook, you tend to get different error messages based on the situation.
In this post, you will know ways to fix printer spooling errors in printers.
How To Fix Printer Spooling Error in Printers
Solution 1 – Reboot system
The easiest solution is to restart your system and then begin sending requests.
When the system gets loaded with programs and applications, it can be sorted by closing windows and allowing the processor to reboot. It does work for quite a lot of us.
Solution 2 – Check Print Spooler properties
In several systems, there is a need to reset the print spooler.
Sometimes, the properties are not properly set resulting in errors like “The print spooler service is not running” or “Printer spooler error”.
Step 1 – Press Windows + R and type services.msc. It opens a services window.
Step 2 – Hover on to Print Spooler option on the right pane. Double click.
Step 3 – Click on Stop the service option. This is meant to temporarily stop if the printer is hanging abruptly.
Step 4 – Click on Start the service option after some time.
Step 5 – Check if the printer spooler is working normally. Else, follow steps 1 and 2 and then choose Restart the service. This works when the spooler is jammed and needs an internal overhaul.
Step 6 – Start the service.
Step 7 – Open Print Spooler Properties and hover on to Startup type. Choose Automatic. This lets the printer automatically address the spooling issue without stopping the print job. Click Apply.
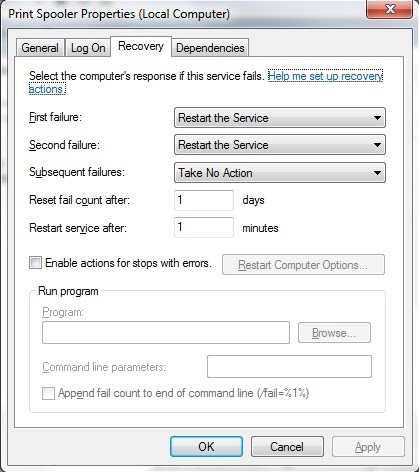
Step 8 – Next, go to the Recovery tab. Choose Restart the Service in the first failure section and Restart the Service in the second failure. Under subsequent failure, choose Take No Action. Set reset fail count after option to 1 day and restart service option to 1 minute. Click Apply.
Step 9 – Next, go to the Logon tab. Uncheck the option ‘Allow interaction with desktop’. Click Apply.
Step 10 – Close Properties Window and begin printing.
Note – There can be problems in some systems even after following all the steps mentioned above. But, we have covered your query with a practical solution.
1 – Go back to the Properties tab and select the Dependencies tab.
2 – Find out if your printer is listed under the dependency list.
3 – Check if Started is seen in the status column and Automatic is seen in the startup type column.
Solution 3 – Erase Printer queue
When you wish to print and the jobs are getting queued, you may have to erase the queue and then restart the service. Here is how you should do it.
Step 1 – Go to the Printer Spooler Properties window (the steps are mentioned in the previous solution).
Step 2 – Select ‘stop the service’.
Step 3 – Go to My Computer and then double-click the C folder. Now, double-click the System 32 folder.
Step 4 – You can find Spool in the list of folders. Double-click Spool and then move on to the Printers section.
Step 5 – Delete print jobs seen in the folder.
Step 6 – Go back to Printer Spooler Properties and then right-click. Choose Start option.
You can see that your printer resets to normalcy. Alternatively, you can also erase the queue by visiting the control panel.
In this panel, you can find the Printers and devices option. Right-click on it and then choose ‘see what’s printing’. Now, you may have to stop/end the printing job. This needs to be done manually in most cases.
Solution 4 – Scan all system files
This is a solution when the print jobs contain corrupt files. Perhaps, it is not possible to know the list of corrupted files prior. You can follow the steps below to assess system files and then remove corrupted files from the system.
Step 1 – Restart the system directly in Safe Mode. This is used to ensure that your system is safe and secure.
Step 2 – Hover on Command Prompt and right-click. Choose the option ‘run an administrator’. Type the administrator password.
Step 3 – Once a new window opens, you have to type sfc /scannow and then press Enter.
The system scan will now begin and the verification status will be displayed on the same screen.
Step 4 – Usually, it displays a message stating corrupt files are identified and the mission is successful. This implies that you can restart printing. Alternatively, when the error message insists that it was unable to fix certain files, do the following.
Go to Command Prompt and type the command as follows – findstr /c:”[SR]” %windir%\Logs\CBS\CBS.log >”%userprofile%\Desktop\sfcdetails.txt.
Now, press Enter. You can spot sfcdetails.txt on Desktop.
– Go to Command Prompt and enter takedown /f C:\windows\system32\oldfile. As you press Enter, you are informed about the status.
– To replace the corrupted file, you need to know its path. The command to be used is icacls (path to corrupt file) /grant administrators:F.
– Once it lists the path along with the file name in use, you may have to replace the file by using the command – copy (path to new file) (path to corrupt file)
While these are certain solutions to address the printer spooling error, it is also a healthy thought to update the print driver. This is a solution if the system does not have the latest version of the print driver software.
Conclusion
Spooling is an issue that is common and easily addressable if you invest a bit of effort. The steps mentioned in this article can undoubtedly help you address the printer spooler error. Keep them handy so you can be prepared to address your printer error whenever the spooler throws out an unexpected error!